Color
Management in Adobe Photoshop® part 1:
Color Settings: Introduction and Choosing a Working Color
Space
Adobe Photoshop is one of the most
versatile digital imaging tools available. As such,
it’s handling of color management is quite
sophisticated. In order to take full advantage of
Photoshop’s advanced color management, it is first
necessary to configure Photoshop’s color settings
correctly. (Please note: color management is only available
in the full version of Photoshop 5.0 or later. Photoshop
Elements, LE, and Light do not support multiple profile
color management.)
Adobe Photoshop is utilized by a wide variety of imaging
professionals from web designers to film special effects
artists. For this reason Photoshop ships with color
settings that are easy to use but less than ideal for those
of us concerned with precise color management for printed
output. (The information in this paper does not refer to
color management for the web). To access the color
settings, go to Edit> color settings… (Windows)
or Photoshop> color settings… (Macintosh). This
brings up the color settings dialog box:
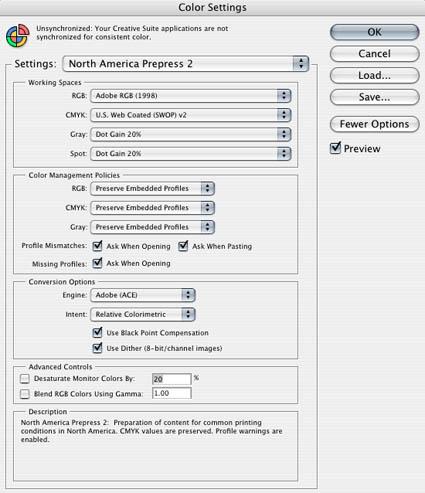
The box contains many
settings that will affect the way that color is handled and
displayed. A shortcut to setting most of them correctly for
print color management is to go to "North American Prepress
2" (called “U.S. Prepress Defaults” prior to
CS2) in the “settings” pull down menu at the
top. Next click the "more options" box (called
“advanced mode” in CS1 and earlier) . This
default setting will configure Photoshop with very good
basic color management settings. Some individual options
(such as working space and rendering intent, for example)
can now be changed to customize the US prepress default for
your specific situation. (This will change the “U.S.
Prepress Defaults” setting to “custom”).
If you are looking for a quick and easy general setting
recommendation, just copy the settings pictured above by
selecting North American Prepress 2 from the settings
pulldown. These settings will work adequately for most
users. You can get simple explanations of each setting
option by holding your cursor over the setting. The
explanation will show up in the description section at the
bottom of the color settings dialog box. The section that
you would be most likely to change to configure Photoshop
to your personal workflow is the next one down the dialog,
"Working Spaces".
The working space used for a color mode is often thought of
as being a more critical setting than it actually is.
Contrary to popular belief working space has no effect on
the way that a given image is displayed when color
management is being used properly on tagged files.
At any time Photoshop can
accurately display color from any color space regardless of
the current working space. Another common misconception is that
printer profiles only "work" with the specific color
working space that was set at the time of profiling. This
is not true; working space has absolutely no effect on
profiling if profiling is done correctly. Working space
only comes into play in certain situations in which a
default color space is needed, such as creating a new
document or opening an untagged one. In essence, 16-bit LAB
is actually always the “working space” for
Photoshop since that is where all of your color management
conversions and lookups take place. Many users just set the
working space for each color mode to the space that they
use most often with that mode to simplify thier workflow.
Choice of working spaces also affects how Photoshop
interprets color information from sources like the color
picker and pattern manager. For example, if you use the
eyedropper to "sample" an RGB color into the color picker,
then try to paint that color into a document with a
different color mode, Photoshop uses the color
meaning of the numbers
in your working color space, regardless of the space that
they actually came from. In fact, a change of color modes
is the only time that the color picker actually is color
managed. You can see that the color picker is not color
managed by sampling a color in one RGB space and painting
it into a file with another RGB color space or RGB profile.
Photoshop will paint in the RGB color numbers from the
first file, which in the second file's color space would
have a different color meaning, thus giving you a different
color. If you plan to sample and paint from file to file on
a regular basis, then you should be aware of this and you
should probably choose the working space that matches most
of the files that you deal with.
Almost all digital capture devices, scanners and digital
cameras are native RGB devices. CMYK color spaces typically
describe a range of printing press conditions and are
therefore more similar to a profile than a true working
space. As such they generally have comparatively small
color gamuts. Since each conversion to another mode
involves at least some loss of color information, and
converting to a small gamut space like most CMYK spaces may
lose a lot of color information, many experts argue that
RGB is the ideal color mode for Photoshop. CMYK and
Grayscale working spaces are unimportant in this scenario
since they are never used. Unless you have a specific
reason not to do so, it is usually best to adopt this RGB
only workflow and to leave the CMYK and grayscale working
spaces set to their U.S. Prepress Defaults. For a graphic
designer who is creating work destined for an offset CMYK
press, however, It may be perfectly reasonable to convert
to CMYK as early as possible. People in this situation
should have a pretty good idea of what conditions their
press is set to emulate, and can set their working space to
the profile associated with those conditions.
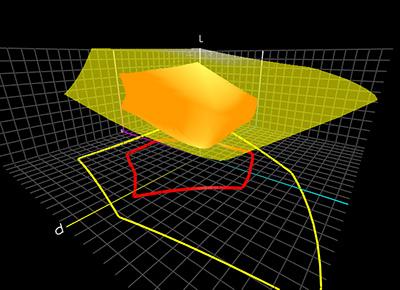
A typical
CMYK color space, SWOP Coated,
(red/orange) compared with Adobe 98
(yellow).
Go to part 2: Other
Settings
Return to The
Educational Information home
page